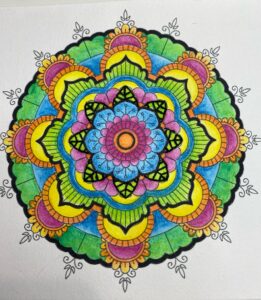
I have always wanted to see what it would be like to color a page and then embroider it. Finally, after years of being on my “to do” list I’ve made a start. If you want to join me “colorflossing” then you will need a few low cost items to get started.
Why Embroider on Paper
Embroidering on paper can be used to fill in whole elements on your page or to embellish your coloring page. The different threads, colors and the texture can give your coloring page a whole new look and purpose. You can use it to create contrast, highlights and add new dimension to your coloring page.
Combining the two forms of creativity can produce amazing pieces of art that would be difficult to replicate with coloring mediums.
The act of coloring is incredibly relaxing but often it is not convenient. Embroidery can be just as relaxing but it also acts as a challenge to our creativity to assess how and where we will incorporate the stitching into our colored pages.
Getting started
The list below shows what I have been doing and what works for me. I am not an expert at embroidery at all and no doubt, there may be other ways that are better or more efficient. The most important thing is to find out what works for you and experiment. You can really unleash your creativity when you embrace these two hobbies together.
Theoretically, you can embroider anything as long as you can push a needle through it. The reality is though when embroidering on paper it is very susceptible to tearing or damage. Always test and experiment first on the paper of your choice before tackling your colored work.
You will need:
- A coloring page to embroider. Preferably, the page will be printed on at least 160 gsm watercolor paper as that is sturdy enough to hold the coloring medium, hole punching, and embroidering. I used 160 gsm watercolour paper from Kmart. The page I used is the March Mandala a Month available for free from my Ko-Fi Store.
- Tailor’s awl.

Tailor’s Awl
This small tool has a pointed end and a handy grip to hold making it easy to pierce holes in your paper without tearing. I purchased my awl from Spotlight in Australia for less than $5. If you do not wish to purchase an awl you can experiment with household items – a compass, thumb tack, embroidery or tapestry needle, seam ripper to name a few. Remember, if the tool does not have a hand grip on it, it could be difficult and painful to hold for extended periods of time
- Healing Mat.
We will be using our awl to pierce holes in our coloring page so we will need something to protect our work surface. You can purchase craft healing mats at discount stores and art and craft shops. I have also used my mouse mat. It now has a lot of little holes pierced in it as it doesn’t heal but it certainly served the purpose. You could use foam, cardboard, chopping board, or any other item that provides a solid base and protects your surface from becoming pock-marked.
- Thread.
Now for the pretty part! You can choose any embroidery thread that you fancy. You can purchase thread in single skeins of one color or often very cheaply from discount stores in a bundle. You can also use crochet thread, wool, sewing thread, and even metallic threads. Some threads are easier to use and some break easily but that’s all part of the fun!
- Needles. You need a needle with a sharp point. Most people recommend embroidery needles and beading needles. I used the normal packet of sewing needles that is in every sewing kit
- Needle Threader (optional). If you have difficulty threading needles due to motor or visual impairment these needle threaders make the task so much easier
- Pin cushion (optional) Super handy to have to park your needle when it is not in use
Warning
You will also need a basic knowledge of embroidery stitches particularly, the ones that work well on paper. Always have a practice first before diving in on your colored page. If you are uncertain and just want to experiment remember you can always take a copy of your colored page and work on that and you can always undo the embroidery but it is very difficult, if not impossible, to repair a torn, pierced, or too large hole on your paper.
Tips
Now that you have assembled your supplies it’s time to embroider! Watch the video above to see how I have used Backstitch on the leaves of the mandala.
Before you start embroidering:
- Assess your colored page and have a look at what parts of your picture you would like to embellish with embroidery. Consider the colors, the amount of fill, the number of holes that would be needed, and the type of stitches that you would like to incorporate
- Start with a small area of your picture and after placing it on your healing mat, take your awl and assess where and how big your holes and the space between the holes should be. Some types of embroidery stitches may require more holes and you may need to carefully consider where to position the holes. In my video, I positioned the holes at all the points of the vein and outline of the leaf.

March Mandala quickly colored with Inktense. Leaves outlined and embroidered in black thread
- push firmly but gently to create your first hole. Remember when placing your holes this will dictate the size of the finished stitch and in some cases the type of stitch. It is far easier to create a hole that is too small and enlarge it later with a needle than to create a large hole to start with. Just like coloring light to dark makes it easier to erase the same with punching holes.
- Decide how many strands of floss you want to. use. Some embroidery cottons have 6 strands, some have two. You can use the whole strand, divide it up into strands, and use either as a single thread (very fine) two, three, four, or five threads. Remember the more threads the larger the eye of the needle will need to be as well as the pierced hole and more threads will fill the area on your colored page faster than less strands. Cut a length of strand about 30 cm (or from wrist to elbow). If your strand is too long it tends to get tangled – you can always cut more if you run out.
- Thread your needle. If you have visual impairment use a needle threader. Try and have a double knot at the end. I wind the thread twice around my finger but some people do this around a needle. If the knot is not big enough it may pull through your pierced hole. This would mean that the start of your embroidery is not secure and also your pierced hole may now be too big or damaged
- Remember to go back into your first stitch and tie it off to ensure your embroidery is secure
- When you have finished embroidering the section of the picture remember to go back to the last stitch and tie it off to make sure your embroidery is secure.
I am going to continue embroidering my colored mandala using different stitches throughout. I hope you join me in the next video for a bit more colorflossing!
Happy coloring x
Lea


Leave a Comment